Crafting a Decorative Bee Skep for Pennies
My artistic side has been calling to me lately. There are only so many games you can play online. I've also gone through a few adult coloring books too. So even though I am not what you would call "crafty", I was beginning to get the crafting bug. Yes, I know. I'm the type that collects all the bits and bobs of a craft that I'm going to do. And after I've collected all the range of pieces, invariably, I will wander off in another direction and leave the thoughts of that craft behind, going on to the next adventure. After all, I have a whole tub of beads, feathers, stickers, markers, journal papers and more. I dream of crafting, but I never seem to actually follow through. I guess it is a fear of failure type of thing. That's why this new year I have vowed to finish all those little crafts that have filled my head and actually finish them before going on to another.
First on the agenda is a homemade decorative bee skep. The idea came to me after I found out what these things cost in the stores! Yikes, anywhere from $30 to $100!!! I've always loved the look of them and wanted one to decorate with. They are outlawed here in the U.S. and some other countries for bee usage because the act of getting at the honey actually kills the bees and we don't want that. But I do enjoy the look of them and wanted to decorate with it. So why couldn't I make one myself? It didn't look that hard. Besides, I'm a bit thrifty and I can't see spending that much on a household knick-knack.
Long ago, before wooden bee hives came into existence, people actually used bee skeps in their quest to have home-grown honey. These were traditional hand-woven beehives commonly used in beekeeping in Europe. Skep comes from the Norse word "skeppa" which means "basket". And that's a little of what they look like. They were also referred to as straw skeps, since these hives (used to raise bees in and easily transport them) were made of strands of straw or rye straw that were coiled together to form a sturdy, dome-shaped structure. So, it is a neat nod to nostalgia to decorate my garden bench with one.
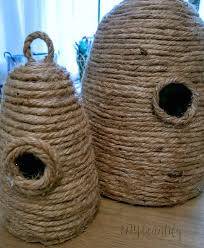
I went online and found there were all kinds of ways to make them. The way I settled on was using some jute rope, a glue gun and an empty vinegar bottle. First step was cleaning and drying the jug. Next, I put some dried beans in the bottom of the jug to make it sturdier and less easy to tip over. You could also use small stones or dry rice. You don't need much, just about two inches or so at the bottom. I found that it works best if you use the hot temperature glue gun, rather than the low temp one. All you do is start gluing the jute rope all along the bottom edge. Make sure it cools. Then you start putting glue along the top of the bottom rope and keep gluing and going around and around. It actually only took me about an hour. When you get close to the top, make sure to create your loop (holder) at the top by gluing a piece of rope securely before you finish looping the edge all the way up to the top. Basically, you are finished...unless you want to do a bit of decorating. I got a few small bee pins to put on. And I cut a circle from an old black sock as an "entrance" to the hive. I glued it to coils and finished it out by gluing a piece of jute all around the edge of it.
I am so happy I got it done. For just an hour or so in the evening, I created a beautiful decoration, and I actually finished a craft! Now I want to make a few smaller ones to go with it. For that, you don't need a jug. You merely take the jute rope and coil it around and glue to make a mat the width of the skep you want to create. The mat makes a sturdy base for your smaller skep. Then you just start gluing around the outer edge of the mat and keep going around and around until you make the loop top and finish it off.
Now that I have had some crafting success, the ideas are coming fast and furious. I'm afraid I have started something here. Next week you may find me covered in glitter and pieces of fabric. I will keep you updated...


My work in progress---almost done! Some decorative bee pins I used to add some sparkle!
Add comment
Comments
This will be a great addition to my little garden this year, I love it!